Your server runs CSF (ConfigServer Security & Firewall), which automatically blocks IPs that fail too many logins, hit protected ports, or otherwise look like they're attacking the server. Legitimate users sometimes get caught - a mistyped email password a few times, a script with stale credentials, a visitor on a shared IP that someone else abused. This article shows you how to check if an IP is blocked, unblock it, and whitelist IPs you want to trust permanently.
Opening CSF
- Log in to WHM as
root. - In the left-hand navigation, scroll down to Plugins (near the bottom) and click it to expand.
- Click ConfigServer Security & Firewall.
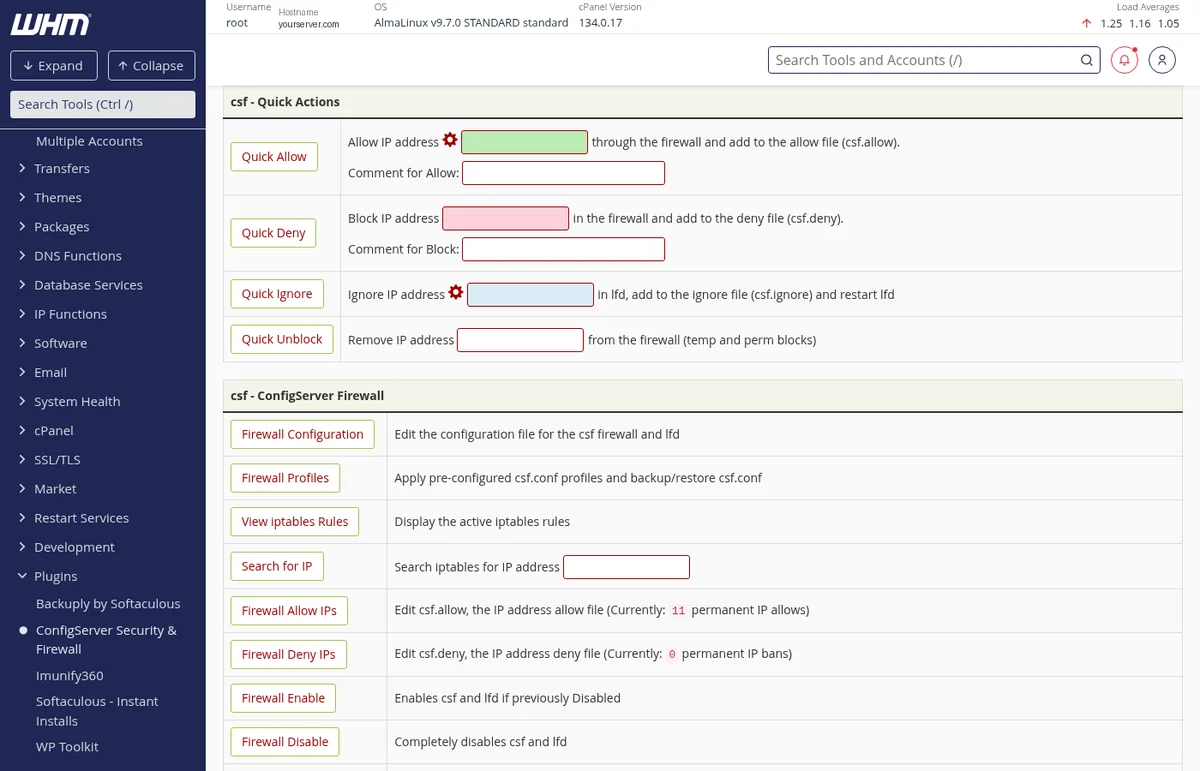
The main CSF page looks busy but most of what you need is in two tables: csf - Quick Actions (one-off actions for a single IP) and csf - ConfigServer Firewall (edit the full lists).
Unblocking an IP (most common task)
A client just messaged saying they can't connect to their email or website? Here's the fix:
- Get the client's IP. Ask them to visit whatismyip.com or ifconfig.co - they can copy the address and send it to you.
- In CSF, find the Quick Unblock row.
- Paste the IP into the Remove IP address field.
- Click the Quick Unblock button.
CSF will remove the IP from both the permanent deny list (csf.deny) and any temporary blocks, and the iptables rule is dropped immediately. The client should be able to connect again right away.
Whitelisting an IP (preventing future blocks)
If the same IP keeps getting blocked - a client's office IP, your own home IP, an external server running scheduled scripts that auth against your server - it's worth whitelisting it so CSF leaves it alone going forward.
- In the Quick Actions table, find the Quick Allow row (the green one).
- Enter the IP address in the Allow IP address field.
- Add a short Comment for Allow - something like Client office - Acme Corp or External cron job server. You'll thank yourself later when reviewing the list.
- Click Quick Allow.
The IP is now in csf.allow and will never be blocked by CSF (neither permanent nor temporary bans apply).
Quick Allow vs Quick Ignore
- Quick Allow (green)
- Explicitly allows the IP through the firewall - bypasses all blocking rules. Use for trusted IPs that need unrestricted access.
- Quick Ignore (blue)
- Tells LFD (the login-failure monitor) to ignore this IP when counting failed logins - it won't trigger automatic blocks. But iptables rules still apply. Useful for IPs you trust but don't want to fully whitelist.
For most cases, Quick Allow is what you want.
Manually blocking (denying) an IP
If you're seeing ongoing attacks from a specific IP (hitting /wp-login.php, running SMTP AUTH attempts, etc.) and CSF hasn't caught it automatically, block it yourself:
- In the Quick Actions table, find the Quick Deny row (the pink one).
- Enter the attacker's IP.
- Add a comment (e.g. wp-login brute force 2026-04-23) for your future reference.
- Click Quick Deny.
That IP is now permanently blocked until you explicitly unblock it.
Viewing and managing the full lists
The Quick Actions are good for one IP at a time. For managing multiple IPs or reviewing what's in the list:
- Firewall Allow IPs
- Click this to open the full
csf.allowfile in an editor. You can add multiple IPs at once (one per line, optionally with# commentat the end), remove stale entries, etc. Click Change to save. - Firewall Deny IPs
- Same thing for
csf.deny- permanently blocked IPs. Useful for reviewing who's been blocked and cleaning out old entries. - Temporary IP Entries
- Shows IPs that were temporarily blocked by LFD (e.g. after failed SSH logins) and haven't expired yet. You can remove individual entries from here.
- Flush all Blocks
- Clears every entry in
csf.deny(except ones marked "do not delete") plus all temporary blocks. Useful after a flood of false positives, but use with care - you'll lose the list of real attackers too.
Common scenarios
My email client keeps getting blocked
Check your email client password first - the usual cause is a stale password on a phone, tablet, or desktop client that keeps retrying with the wrong credentials. Fix the password in every device using that email, then unblock your IP. If you don't fix the credential issue, CSF will just reblock the IP within minutes.
My office IP keeps getting blocked
If you're confident the IP is trustworthy (your office, your home static IP), use Quick Allow instead of just unblocking - this whitelists it permanently so CSF never blocks it again.
A client's office IP keeps getting blocked
Same pattern. Unblock first to get them back online, then Quick Allow their office IP with a comment so you know what it's for. If you're running a reseller account and have many client IPs to whitelist, consider creating a dedicated text note of who belongs to what.
The IP is a whole office or a mobile network - what about the range?
CSF accepts CIDR ranges in both the allow and deny files - e.g. 203.0.113.0/24 allows/blocks a whole /24 block. Use this for office networks with multiple external IPs, but be careful with large ranges (avoid blocking entire ISPs - you'll catch legitimate users).
A cron job or monitoring service from another server keeps getting blocked
External servers running scripts against your server (SMTP auth, API calls, cPanel logins) will often trip LFD. Whitelist the sending server's IP via Quick Allow with a clear comment (e.g. External cron - status checks).
Understanding LFD block alerts
You may receive email alerts from lfd (Login Failure Daemon) about blocked IPs - subjects like "Permanent Block" or "(permblock) [IP] has had more than X blocks in the last X days". These are informational - CSF already handled the block. No action is needed unless you recognize the IP and want to unblock it.
If you're getting a lot of these emails and want to reduce the noise, you can edit /etc/csf/csf.conf and adjust settings like LF_EMAIL_ALERT and LF_PERMBLOCK_ALERT - but we recommend leaving them on so you have visibility into what's happening on your server.
SSH alternative (advanced)
If you prefer command-line access or you're locked out of WHM (e.g. your own IP got blocked), you can do everything from SSH as root:
| Action | Command |
|---|---|
| Check if an IP is blocked (searches deny list, temp bans, iptables) | csf -g 203.0.113.5 |
| Unblock an IP | csf -dr 203.0.113.5 |
| Whitelist (allow) an IP with a comment | csf -a 203.0.113.5 'Office IP' |
| Deny (block) an IP permanently | csf -d 203.0.113.5 'brute force' |
| Temporary block for 1 hour | csf -td 203.0.113.5 3600 -p 22 'ssh attacks' |
| Restart CSF after manual config changes | csf -r |
When to ask us for help
For routine unblocks and whitelisting, you can handle everything yourself with the instructions above. Open a ticket with us if:
- You're completely locked out of WHM and SSH (we can unblock you at the datacenter level if needed)
- You're seeing sustained attacks you can't keep up with manually - we can look at your server's specific traffic patterns and tighten CSF rules to better match
- You want to adjust global CSF settings (
LF_TRIGGERthresholds, alert cadence, etc.) - we're happy to advise on the trade-offs - Anything feels off - we'll investigate and tune as needed, at no extra charge


