Each website you host on your server needs its own cPanel account. This article walks through creating one via WHM.
Before you start
- Know the primary domain name you want to host (e.g.
example.com) - Decide on a cPanel username (lowercase letters and numbers, 8 characters max recommended - usually a short version of the domain, like
example) - Pick a strong password for the account, or use the built-in password generator
- Have an email address for the account owner (for password resets and notifications)
Step-by-step
- Log in to WHM (see Logging in to WHM if you haven't yet).
- In the left sidebar, expand Account Functions and click Create a New Account. You can also click the tile on the Favorites panel of the home page.
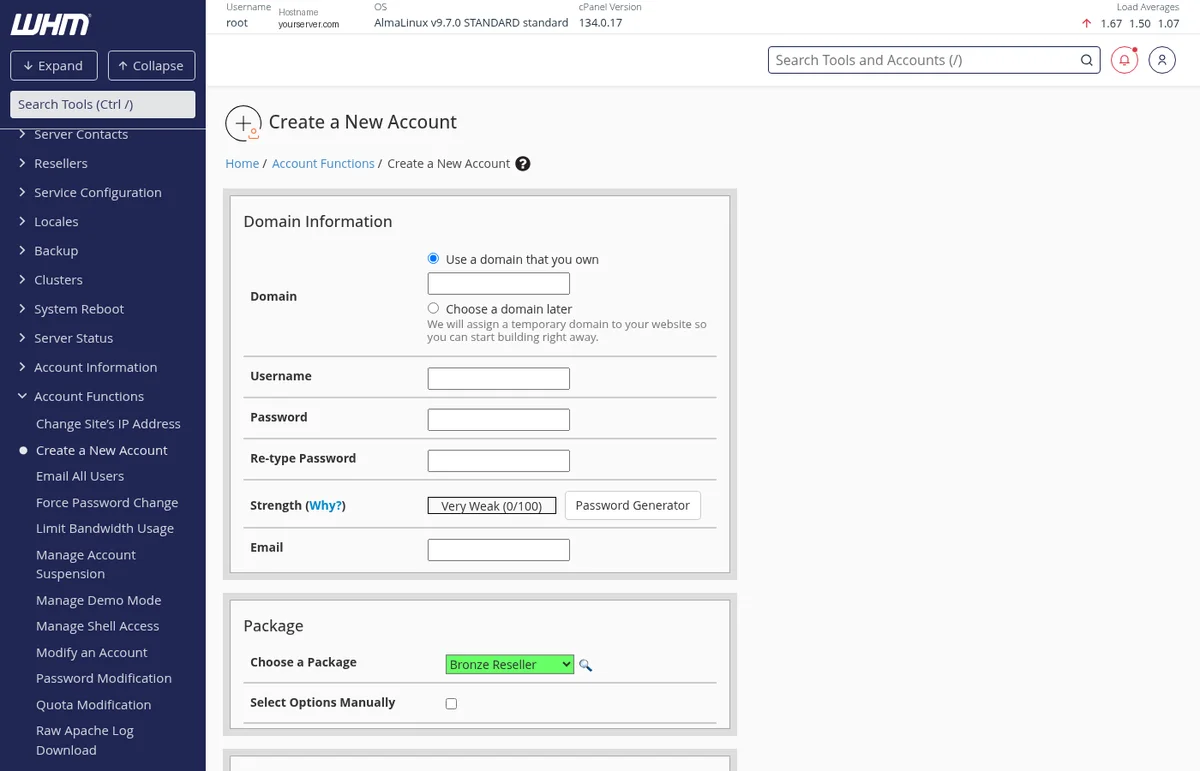
- Fill in Domain Information:
- Domain: the primary domain (e.g.
example.com). Leave the Use a domain that you own radio selected. - Username: a short cPanel username. Must start with a letter, lowercase, no special characters.
- Password / Re-type Password: set a strong password, or click Password Generator. The strength meter should read at least Strong.
- Email: the account owner's contact email (used for cPanel notifications, password resets, etc.).
- Domain: the primary domain (e.g.
- Choose a Package: select one from the dropdown. Packages define resource limits (disk quota, bandwidth, email account count, etc.). If you haven't created custom packages yet, the
defaultpackage gives the account unlimited resources within your server's overall capacity. - Leave the optional sections (Mail Routing, Reseller Settings, DNS Settings) at their defaults unless you have a specific reason to change them - the defaults are correct for most cases.
- Click the Create button at the bottom.
What happens next
WHM will spend about 10-20 seconds setting up the account - creating the Linux user, the cPanel home directory, the default files, the DNS zone, and so on. You'll see a log of each step as it completes.
Once done, the account is ready to use:
- Log in to the new cPanel account at
https://your-server-hostname:2083with the username and password you just set. - Upload your website files to the
public_htmlfolder via File Manager, FTP, or SSH/SCP. - Create email accounts, databases, subdomains, and so on from within cPanel.
Creating packages (optional)
If you'll be creating multiple cPanel accounts with different resource tiers (e.g. a basic tier and a premium tier), it's worth creating your own packages first. Go to Packages → Add a Package - you can set disk quota, bandwidth, email account limits, databases, and feature lists. Then select your custom package when creating accounts.
License limits
Your cPanel license caps the number of accounts you can create. If you try to create an account and WHM says you've hit the limit, it's because your license tier allows only so many. Just open a ticket and let us know - we'll make sure your license matches the plan you purchased so you can continue.
Modifying or removing an account
- Modify an Account - change the package, quota, or other settings of an existing account (under Account Functions).
- List Accounts - see all accounts on the server, with quick links to log in as them, view cPanel, terminate, etc.
- Terminate an Account - permanently remove an account and all of its data. Can't be undone except by restoring from backup, so be careful.


